When Domain Connect fails - a workaround to add DNS records manually
Update: the issue has been resolved.

When I was trying to add some DNS records to enable an iCloud custom email domain, following the instructions in iCloud settings and being redirected to Cloudflare, I encountered the following error:
Cloudflare cannot proceed with applying new DNS records for iCloud because this URL is not verified.
After several attempts, I discovered that others were experiencing the same issue:
https://community.cloudflare.com/t/custom-domain-with-icloud-url-is-not-verified/689204
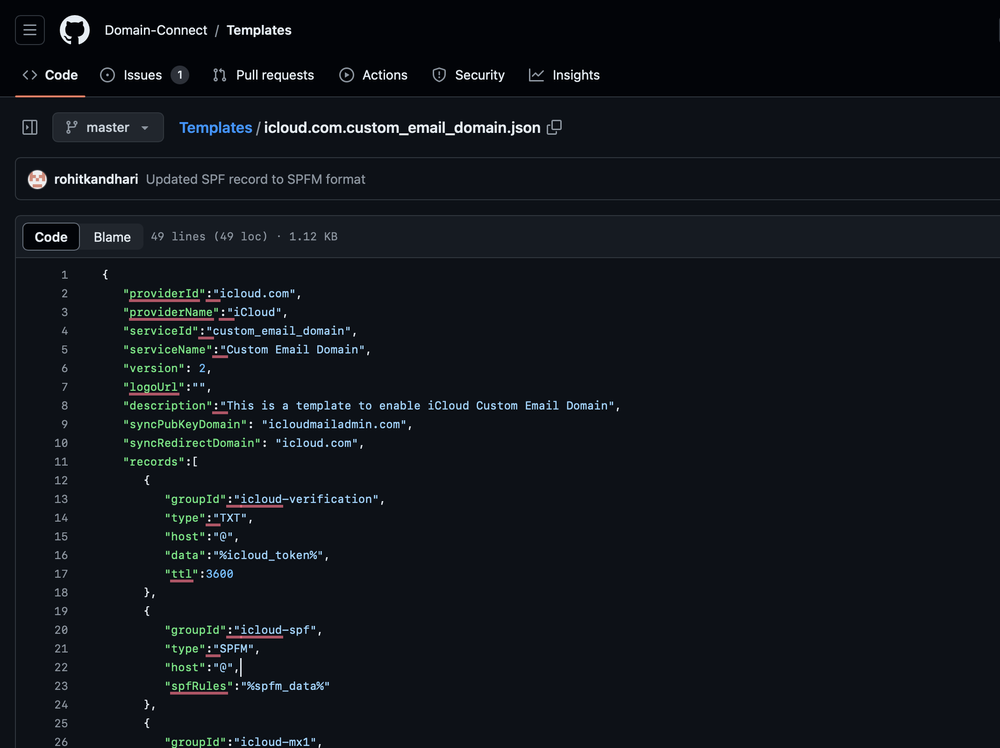
However, I then noticed that this workflow of adding DNS records is based on an open standard called Domain Connect, and the template for service providers to apply their configuration is publicly available. The template for configuring the iCloud custom email domain is available here.
Now we already have the template, and we need to know how the Domain Connect works. in this case, iCloud uses a synchronous flow to guide users through applying the required DNS changes. Based on this flow, we can complete the necessary steps manually.
Decoding the URL
https://dash.cloudflare.com/domainconnect/v2/domainTemplates/providers/icloud.com/services/custom_email_domain/apply?domain=[redacted]&state=[redacted]&redirect_uri=https%3A%2F%2Fgateway.icloud.com%2Fmaildomainws%2Fv1%2Fdomain%2FdomainConnectReply&mx1_data=mx01.mail.icloud.com.&mx2_data=mx02.mail.icloud.com.&icloud_token=[redacted]&dkim_host=sig1._domainkey&dkim_data=[redacted]&spfm_data=include%3Aicloud.com&sig=[redacted]&key=[redacted]Above is the URL generated by iCloud for us to complete the setup. However, when visiting this URL, it gives us the error above. However, if we look at the URL parameters, we can easily find all the information we need. Let's start by decoding the URL first:
https://dash.cloudflare.com/domainconnect/v2/domainTemplates/providers/icloud.com/services/custom_email_domain/apply?domain=[redacted]
&state=[redacted]
&redirect_uri=https://gateway.icloud.com/maildomainws/v1/domain/domainConnectReply
&mx1_data=mx01.mail.icloud.com.
&mx2_data=mx02.mail.icloud.com.
&icloud_token=[redacted]
&dkim_host=sig1._domainkey
&dkim_data=[redacted]
&spfm_data=include:icloud.com
&sig=[redacted]
&key=[redacted]
Applying DNS changes based on the template
Now that we have obtained the parameters from the last step, we can replace the template string and attempt to construct DNS records. Most record types are straightforward; however, for the SPFM type, we need to consult the documentation.
The document provides an example of the SPFM record type. Meaning we should construct the SPF record as follows:
v=spf1 %{spfm_data} ~allTell iCloud that DNS changes were complete
After we added all the DNS records, it was time to tell iCloud that changes were applied and the verification process could be started. This step is necessary because iCloud specified the redirect_uri. Now let's look at the document again.
The second is in the current browser tab/window. As above the DNS Provider signs the user in if necessary, verifies the user control of the DNS Zone for the domain, and asks for confirmation before application of the template. After application of the template (or cancellation by the user), the DNS Provider must redirect the browser to a return URL (redirect_uri).
Several parameters must be appended to the end of this redirect_uri.StateIf a state parameter is passed in on the query string, this must be passed back as state= on the redirect_uri.
Therefore, we were able to construct the redirect_url in the above format, which in this specific case is:
https://gateway.icloud.com/maildomainws/v1/domain/domainConnectReply?state=[redacted]Upon visiting the URL, we noticed that iCloud successfully initiated the verification process, and the custom domain email was added successfully.


